こんにちは、キクです。
本記事は、僕が自己学習で学んだことをブログでアウトプットするシリーズになります。
それでは、よろしくお願いします。
注意事項
本記事は自己学習としてのアウトプットが目的となります。
そのため、本記事には誤った情報が含まれる可能性もありますが、ご了承ください。
LAMP環境について LAMP環境とは 4つのオープンソースソフトウェアを使ったWebアプリ開発環境のこと
LAMPは以下4つから構成され、動的なWebサイトの構築に適したOSSの組み合わせである
LAMPの構成要素
Linux(OS)
Apache(サーバ)
MySQL / MariaDB(データベース)
PHP / Python / Perl(プログラミング言語)
主なメリット
基本的にコストがかからない(OSSなので)
高いカスタマイズ性
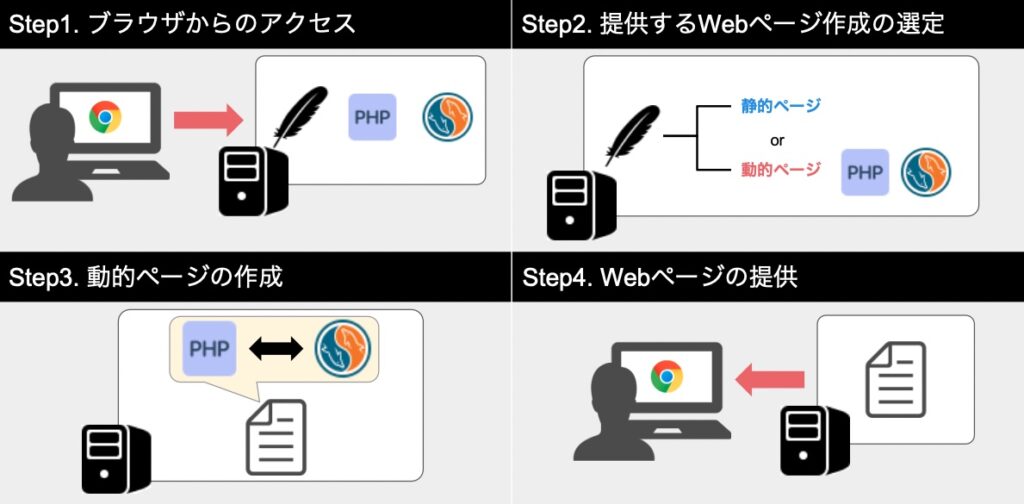
それぞれの動きと役割 Icons by Icons8 1. ブラウザがWebサーバにアクセス
Webサーバ(Apache)がブラウザからの要求を受ける
2. WebサーバによるWebページ作成開始
Webサーバ(Apache)はブラウザからの要求に従ってWebページ生成に必要なファイルを探し始める
静的ページの場合:見つけたファイルをそのまま提供 -> Step4へ
主な担当
Apache(サーバ)
PHP(プログラミング言語)
3. データベースからWebページ生成に必要なデータを取得
PHPとMySQLとで通信を行い、PHPは「商品名」や「値段」などの情報をデータベースから取得してWebページ生成を行う
主な担当
PHP(プログラミング言語)
MySQL(データベース)
4. WebサーバがブラウザにWebページを提供
静的ページの場合はStep2で見つけたファイル、動的ページの場合はStep3でPHPが完成させたファイルをWebサーバに渡す
主な担当
Apache(サーバ)
PHP(プログラミング言語)
参考:LAMP環境とは?ECサイトを例にLAMPの機能・役割を解説
関連調査メモ ファイアウォール設定 レンタルサーバなど環境によってはデフォルトで80番ポートが空いていないことがある
以下のようなコマンドで許可する
$ sudo firewall-cmd --permanent --add-service=http
$ sudo firewall-cmd --reload
Apache関連 Apacheの設定ファイル「httpd.conf」にて接続元を制限できる模様
■全許可
<Directory "/var/www/cgi-bin">
    AllowOverride None
    Options None
    Require all granted
</Directory>
■全拒否
<Directory "/var/www/cgi-bin">
    AllowOverride None
    Options None
    Require all denied
</Directory>
■特定IPアドレスのみ許可
<Directory "/var/www/cgi-bin">
    AllowOverride None
    Options None
    Require xx.xx.xx.xx/xx
</Directory>
MySQL関連 MySQLのパッケージはRHEL / CentOSの標準リポジトリには存在しないMySQL公式リポジトリ を追加する必要がある
# yum -y install http://dev.mysql.com/get/mysql-community-release-el7-5.noarch.rpm
リポジトリ取得後はrepoファイル(mysql-community-xxxx.repo)が追加された
[root@homeserver ~]# ll /etc/yum.repos.d/
total 44
-rw-r--r--. 1 root root 4229 Mar  2  2022 centos-addons.repo
-rw-r--r--. 1 root root 2588 Mar  2  2022 centos.repo
-rw-r--r--. 1 root root 1142 Aug 17  2023 epel-cisco-openh264.repo
-rw-r--r--. 1 root root 1621 Aug 17  2023 epel-next-testing.repo
-rw-r--r--. 1 root root 1519 Aug 17  2023 epel-next.repo
-rw-r--r--. 1 root root 1552 Aug 17  2023 epel-testing.repo
-rw-r--r--. 1 root root 1453 Aug 17  2023 epel.repo
-rw-r--r--. 1 root root 2129 Oct 24 13:13 mysql-community-debuginfo.repo
-rw-r--r--. 1 root root 1989 Oct 24 13:13 mysql-community-source.repo
-rw-r--r--. 1 root root 1910 Oct 24 13:13 mysql-community.repo
PHP関連 そもそもPHPってどんなもの? 動的なコンテンツの作成に向いているプログラミング言語
HTMLと組み合わせて使用できたり、MySQLなどのデータベースとの連携が容易といった特徴がある
また、ショッピングカート機能で「何を」「いくついれて」「合計いくらか」などの処理も実装することもできる
参考:【初心者向け】PHPとは?PHPでできること&PHPとHTMLの違い 参考:PHPとは?基礎知識、できることを初心者にもわかりやすく解説します
パッケージメモ php-mysql:PHPからMySQLに接続するために利用
参考:【初心者向け】phpMyAdminとは?インストール方法、使い方までわかりやすく解説
実機練習(CentOS Stream 9) 今回は下記サイトを参考にさせていただきながら実機での練習をしていこうと思います。
参考:LAMP環境構築マニュアル ① 概要編
1. Apache Apacheの導入 1. Apacheインストール
# yum install -y httpd実行例
# yum install -y httpd
Failed to set locale, defaulting to C.UTF-8
CentOS Stream 9 - BaseOS 2.5 kB/s | 4.5 kB 00:01
CentOS Stream 9 - BaseOS 637 kB/s | 8.8 MB 00:14
CentOS Stream 9 - AppStream 4.2 kB/s | 4.6 kB 00:01
CentOS Stream 9 - AppStream 746 kB/s | 17 MB 00:23
CentOS Stream 9 - Extras packages 6.3 kB/s | 6.9 kB 00:01
Extra Packages for Enterprise Linux 9 - aarch64 7.1 kB/s | 8.9 kB 00:01
Extra Packages for Enterprise Linux 9 - aarch64 3.3 MB/s | 20 MB 00:06
Extra Packages for Enterprise Linux 9 - Next - aarch64 7.2 kB/s | 9.1 kB 00:01
Extra Packages for Enterprise Linux 9 - Next - aarch64 352 kB/s | 1.4 MB 00:04
Dependencies resolved.
======================================================================================================================================
Package Architecture Version Repository Size
======================================================================================================================================
Installing:
httpd aarch64 2.4.57-6.el9 appstream 48 k
Installing dependencies:
apr aarch64 1.7.0-12.el9 appstream 119 k
apr-util aarch64 1.6.1-23.el9 appstream 96 k
apr-util-bdb aarch64 1.6.1-23.el9 appstream 13 k
centos-logos-httpd noarch 90.4-1.el9 appstream 252 k
httpd-core aarch64 2.4.57-6.el9 appstream 1.5 M
httpd-filesystem noarch 2.4.57-6.el9 appstream 13 k
httpd-tools aarch64 2.4.57-6.el9 appstream 81 k
mailcap noarch 2.1.49-5.el9 baseos 33 k
Installing weak dependencies:
apr-util-openssl aarch64 1.6.1-23.el9 appstream 15 k
mod_http2 aarch64 1.15.19-5.el9 appstream 145 k
mod_lua aarch64 2.4.57-6.el9 appstream 58 k
Transaction Summary
======================================================================================================================================
Install 12 Packages
Total download size: 2.3 M
Installed size: 11 M
Downloading Packages:
(1/12): mailcap-2.1.49-5.el9.noarch.rpm 54 kB/s | 33 kB 00:00
(2/12): apr-util-bdb-1.6.1-23.el9.aarch64.rpm 190 kB/s | 13 kB 00:00
(3/12): apr-1.7.0-12.el9.aarch64.rpm 163 kB/s | 119 kB 00:00
(4/12): apr-util-openssl-1.6.1-23.el9.aarch64.rpm 244 kB/s | 15 kB 00:00
(5/12): apr-util-1.6.1-23.el9.aarch64.rpm 121 kB/s | 96 kB 00:00
(6/12): httpd-2.4.57-6.el9.aarch64.rpm 479 kB/s | 48 kB 00:00
(7/12): centos-logos-httpd-90.4-1.el9.noarch.rpm 1.4 MB/s | 252 kB 00:00
(8/12): httpd-filesystem-2.4.57-6.el9.noarch.rpm 147 kB/s | 13 kB 00:00
(9/12): httpd-tools-2.4.57-6.el9.aarch64.rpm 731 kB/s | 81 kB 00:00
(10/12): mod_http2-1.15.19-5.el9.aarch64.rpm 959 kB/s | 145 kB 00:00
(11/12): httpd-core-2.4.57-6.el9.aarch64.rpm 2.7 MB/s | 1.5 MB 00:00
(12/12): mod_lua-2.4.57-6.el9.aarch64.rpm 171 kB/s | 58 kB 00:00
--------------------------------------------------------------------------------------------------------------------------------------
Total 880 kB/s | 2.3 MB 00:02
Running transaction check
Transaction check succeeded.
Running transaction test
Transaction test succeeded.
Running transaction
Preparing : 1/1
Installing : apr-1.7.0-12.el9.aarch64 1/12
Installing : apr-util-bdb-1.6.1-23.el9.aarch64 2/12
Installing : apr-util-openssl-1.6.1-23.el9.aarch64 3/12
Installing : apr-util-1.6.1-23.el9.aarch64 4/12
Installing : httpd-tools-2.4.57-6.el9.aarch64 5/12
Running scriptlet: httpd-filesystem-2.4.57-6.el9.noarch 6/12
Installing : httpd-filesystem-2.4.57-6.el9.noarch 6/12
Installing : centos-logos-httpd-90.4-1.el9.noarch 7/12
Installing : mailcap-2.1.49-5.el9.noarch 8/12
Installing : httpd-core-2.4.57-6.el9.aarch64 9/12
Installing : mod_lua-2.4.57-6.el9.aarch64 10/12
Installing : mod_http2-1.15.19-5.el9.aarch64 11/12
Installing : httpd-2.4.57-6.el9.aarch64 12/12
Running scriptlet: httpd-2.4.57-6.el9.aarch64 12/12
Verifying : mailcap-2.1.49-5.el9.noarch 1/12
Verifying : apr-1.7.0-12.el9.aarch64 2/12
Verifying : apr-util-1.6.1-23.el9.aarch64 3/12
Verifying : apr-util-bdb-1.6.1-23.el9.aarch64 4/12
Verifying : apr-util-openssl-1.6.1-23.el9.aarch64 5/12
Verifying : centos-logos-httpd-90.4-1.el9.noarch 6/12
Verifying : httpd-2.4.57-6.el9.aarch64 7/12
Verifying : httpd-core-2.4.57-6.el9.aarch64 8/12
Verifying : httpd-filesystem-2.4.57-6.el9.noarch 9/12
Verifying : httpd-tools-2.4.57-6.el9.aarch64 10/12
Verifying : mod_http2-1.15.19-5.el9.aarch64 11/12
Verifying : mod_lua-2.4.57-6.el9.aarch64 12/12
Installed:
apr-1.7.0-12.el9.aarch64 apr-util-1.6.1-23.el9.aarch64 apr-util-bdb-1.6.1-23.el9.aarch64
apr-util-openssl-1.6.1-23.el9.aarch64 centos-logos-httpd-90.4-1.el9.noarch httpd-2.4.57-6.el9.aarch64
httpd-core-2.4.57-6.el9.aarch64 httpd-filesystem-2.4.57-6.el9.noarch httpd-tools-2.4.57-6.el9.aarch64
mailcap-2.1.49-5.el9.noarch mod_http2-1.15.19-5.el9.aarch64 mod_lua-2.4.57-6.el9.aarch64
Complete!
2. インストール後の確認
[root@homeserver ~]# yum list installed | grep httpd
Failed to set locale, defaulting to C.UTF-8
centos-logos-httpd.noarch          90.4-1.el9                @appstream
httpd.aarch64                      2.4.57-6.el9              @appstream
httpd-core.aarch64                 2.4.57-6.el9              @appstream
httpd-filesystem.noarch            2.4.57-6.el9              @appstream
httpd-tools.aarch64                2.4.57-6.el9              @appstream
3. Apache起動
[起動]
[root@homeserver ~]# systemctl start httpd.service
[ステータス確認]
[root@homeserver ~]# systemctl status httpd.service
● httpd.service - The Apache HTTP Server
     Loaded: loaded (/usr/lib/systemd/system/httpd.service; disabled; vendor preset: disabled)
     Active: active (running) since Sat 2024-02-17 21:42:08 UTC; 1min 17s ago
       Docs: man:httpd.service(8)
   Main PID: 864 (httpd)
     Status: "Total requests: 0; Idle/Busy workers 100/0;Requests/sec: 0; Bytes served/sec:   0 B/sec"
      Tasks: 213 (limit: 49472)
        CPU: 629ms
     CGroup: /system.slice/httpd.service
             ├─864 /usr/sbin/httpd -DFOREGROUND
             ├─865 /usr/sbin/httpd -DFOREGROUND
             ├─866 /usr/sbin/httpd -DFOREGROUND
             ├─867 /usr/sbin/httpd -DFOREGROUND
             └─868 /usr/sbin/httpd -DFOREGROUND

Feb 17 21:41:23 homeserver systemd[1]: Starting The Apache HTTP Server...
Feb 17 21:41:46 homeserver httpd[864]: AH00558: httpd: Could not reliably determine the server's fully qualified domain name, using f>
Feb 17 21:42:08 homeserver httpd[864]: Server configured, listening on: port 80
Feb 17 21:42:08 homeserver systemd[1]: Started The Apache HTTP Server.
4. Apache自動起動設定
[root@homeserver ~]# systemctl enable httpd.service
Created symlink /etc/systemd/system/multi-user.target.wants/httpd.service → /usr/lib/systemd/system/httpd.service.
ファイアウォール設定 1. firewall起動状況の確認
[root@homeserver ~]# systemctl status firewalld
● firewalld.service - firewalld - dynamic firewall daemon
     Loaded: loaded (/usr/lib/systemd/system/firewalld.service; enabled; vendor preset: enabled)
     Active: active (running) since Wed 2022-04-20 00:00:09 UTC; 1 year 9 months ago
       Docs: man:firewalld(1)
   Main PID: 310 (firewalld)
      Tasks: 2 (limit: 49472)
        CPU: 3.583s
     CGroup: /system.slice/firewalld.service
             └─310 /usr/bin/python3 -s /usr/sbin/firewalld --nofork --nopid

Apr 20 00:00:07 homeserver systemd[1]: Starting firewalld - dynamic firewall daemon...
Apr 20 00:00:09 homeserver systemd[1]: Started firewalld - dynamic firewall daemon.
2. Apacheアクセス許可設定
[作業前確認]
[root@homeserver ~]# firewall-cmd --list-service --zone=public --permanent
cockpit dhcpv6-client ssh
[許可設定]
[root@homeserver ~]# firewall-cmd --add-service=http --permanent
success
[作業後確認]
[root@homeserver ~]# firewall-cmd --list-service --zone=public --permanent
cockpit dhcpv6-client http ssh
[設定の反映]
[root@homeserver ~]# firewall-cmd --reload
success
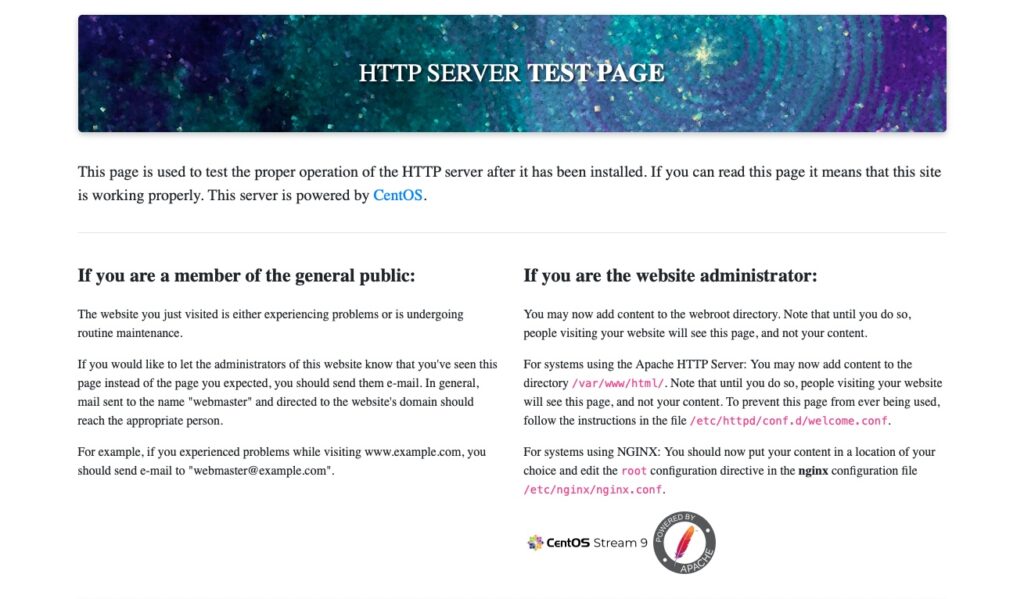
3. Apacheへの接続確認(ブラウザ)
接続先URL:http://WebサーバIPアドレス
2. MySQL 1. MySQLリポジトリのインストール
[root@homeserver ~]# yum install https://dev.mysql.com/get/mysql80-community-release-el9-5.noarch.rpm実行例
[root@homeserver ~]# yum install https://dev.mysql.com/get/mysql80-community-release-el9-5.noarch.rpm
Failed to set locale, defaulting to C.UTF-8
Last metadata expiration check: 0:17:51 ago on Sat Feb 17 21:45:09 2024.
mysql80-community-release-el9-5.noarch.rpm                                                            7.0 kB/s |  13 kB     00:01
Dependencies resolved.
======================================================================================================================================
 Package                                     Architecture             Version                    Repository                      Size
======================================================================================================================================
Installing:
 mysql80-community-release                   noarch                   el9-5                      @commandline                    13 k

Transaction Summary
======================================================================================================================================
Install  1 Package

Total size: 13 k
Installed size: 12 k
Is this ok [y/N]: y
Downloading Packages:
Running transaction check
Transaction check succeeded.
Running transaction test
Transaction test succeeded.
Running transaction
  Preparing        :                                                                                                              1/1
  Installing       : mysql80-community-release-el9-5.noarch                                                                       1/1
  Verifying        : mysql80-community-release-el9-5.noarch                                                                       1/1

Installed:
  mysql80-community-release-el9-5.noarch

Complete!
ポイント
上記コマンド実行後はMySQLのリポジトリファイルが追加されている
▼作業前
[root@homeserver ~]# ll /etc/yum.repos.d/
total 32
-rw-r--r--. 1 root root 4229 Mar  2  2022 centos-addons.repo
-rw-r--r--. 1 root root 2588 Mar  2  2022 centos.repo
-rw-r--r--. 1 root root 1142 Aug 17  2023 epel-cisco-openh264.repo
-rw-r--r--. 1 root root 1621 Aug 17  2023 epel-next-testing.repo
-rw-r--r--. 1 root root 1519 Aug 17  2023 epel-next.repo
-rw-r--r--. 1 root root 1552 Aug 17  2023 epel-testing.repo
-rw-r--r--. 1 root root 1453 Aug 17  2023 epel.repo
▼作業後
[root@homeserver ~]# ll /etc/yum.repos.d/
total 44
-rw-r--r--. 1 root root 4229 Mar  2  2022 centos-addons.repo
-rw-r--r--. 1 root root 2588 Mar  2  2022 centos.repo
-rw-r--r--. 1 root root 1142 Aug 17  2023 epel-cisco-openh264.repo
-rw-r--r--. 1 root root 1621 Aug 17  2023 epel-next-testing.repo
-rw-r--r--. 1 root root 1519 Aug 17  2023 epel-next.repo
-rw-r--r--. 1 root root 1552 Aug 17  2023 epel-testing.repo
-rw-r--r--. 1 root root 1453 Aug 17  2023 epel.repo
-rw-r--r--. 1 root root 2129 Oct 24 13:13 mysql-community-debuginfo.repo
-rw-r--r--. 1 root root 1989 Oct 24 13:13 mysql-community-source.repo
-rw-r--r--. 1 root root 1910 Oct 24 13:13 mysql-community.repo
2. MySQLインストール
[root@homeserver ~]# yum install mysql-community-server実行例
[root@homeserver ~]# yum install mysql-community-server
Failed to set locale, defaulting to C.UTF-8
MySQL 8.0 Community Server 2.3 MB/s | 1.4 MB 00:00
MySQL Connectors Community 35 kB/s | 45 kB 00:01
MySQL Tools Community 333 kB/s | 493 kB 00:01
Last metadata expiration check: 0:00:01 ago on Sat Feb 17 22:09:08 2024.
Dependencies resolved.
======================================================================================================================================
Package Architecture Version Repository Size
======================================================================================================================================
Installing:
mysql-community-server aarch64 8.0.36-1.el9 mysql80-community 48 M
Installing dependencies:
libaio aarch64 0.3.111-13.el9 baseos 25 k
libtirpc aarch64 1.3.3-2.el9 baseos 93 k
mysql-community-client aarch64 8.0.36-1.el9 mysql80-community 3.4 M
mysql-community-client-plugins aarch64 8.0.36-1.el9 mysql80-community 1.3 M
mysql-community-common aarch64 8.0.36-1.el9 mysql80-community 556 k
mysql-community-icu-data-files aarch64 8.0.36-1.el9 mysql80-community 2.3 M
mysql-community-libs aarch64 8.0.36-1.el9 mysql80-community 1.4 M
perl-AutoLoader noarch 5.74-481.el9 appstream 21 k
perl-B aarch64 1.80-481.el9 appstream 180 k
perl-Carp noarch 1.50-460.el9 appstream 30 k
perl-Class-Struct noarch 0.66-481.el9 appstream 22 k
perl-Data-Dumper aarch64 2.174-462.el9 appstream 55 k
perl-Digest noarch 1.19-4.el9 appstream 26 k
perl-Digest-MD5 aarch64 2.58-4.el9 appstream 37 k
perl-Encode aarch64 4:3.08-462.el9 appstream 1.7 M
perl-Errno aarch64 1.30-481.el9 appstream 14 k
perl-Exporter noarch 5.74-461.el9 appstream 32 k
perl-Fcntl aarch64 1.13-481.el9 appstream 20 k
perl-File-Basename noarch 2.85-481.el9 appstream 17 k
perl-File-Path noarch 2.18-4.el9 appstream 36 k
perl-File-Temp noarch 1:0.231.100-4.el9 appstream 60 k
perl-File-stat noarch 1.09-481.el9 appstream 17 k
perl-FileHandle noarch 2.03-481.el9 appstream 15 k
perl-Getopt-Long noarch 1:2.52-4.el9 appstream 61 k
perl-Getopt-Std noarch 1.12-481.el9 appstream 15 k
perl-HTTP-Tiny noarch 0.076-462.el9 appstream 54 k
perl-IO aarch64 1.43-481.el9 appstream 88 k
perl-IO-Socket-IP noarch 0.41-5.el9 appstream 43 k
perl-IO-Socket-SSL noarch 2.073-1.el9 appstream 219 k
perl-IPC-Open3 noarch 1.21-481.el9 appstream 22 k
perl-MIME-Base64 aarch64 3.16-4.el9 appstream 31 k
perl-Mozilla-CA noarch 20200520-6.el9 appstream 13 k
perl-Net-SSLeay aarch64 1.92-2.el9 appstream 389 k
perl-POSIX aarch64 1.94-481.el9 appstream 96 k
perl-PathTools aarch64 3.78-461.el9 appstream 88 k
perl-Pod-Escapes noarch 1:1.07-460.el9 appstream 21 k
perl-Pod-Perldoc noarch 3.28.01-461.el9 appstream 87 k
perl-Pod-Simple noarch 1:3.42-4.el9 appstream 225 k
perl-Pod-Usage noarch 4:2.01-4.el9 appstream 41 k
perl-Scalar-List-Utils aarch64 4:1.56-461.el9 appstream 72 k
perl-SelectSaver noarch 1.02-481.el9 appstream 11 k
perl-Socket aarch64 4:2.031-4.el9 appstream 55 k
perl-Storable aarch64 1:3.21-460.el9 appstream 94 k
perl-Symbol noarch 1.08-481.el9 appstream 14 k
perl-Term-ANSIColor noarch 5.01-461.el9 appstream 49 k
perl-Term-Cap noarch 1.17-460.el9 appstream 23 k
perl-Text-ParseWords noarch 3.30-460.el9 appstream 17 k
perl-Text-Tabs+Wrap noarch 2013.0523-460.el9 appstream 24 k
perl-Time-Local noarch 2:1.300-7.el9 appstream 34 k
perl-URI noarch 5.09-3.el9 appstream 121 k
perl-base noarch 2.27-481.el9 appstream 16 k
perl-constant noarch 1.33-461.el9 appstream 24 k
perl-if noarch 0.60.800-481.el9 appstream 14 k
perl-interpreter aarch64 4:5.32.1-481.el9 appstream 70 k
perl-libnet noarch 3.13-4.el9 appstream 130 k
perl-libs aarch64 4:5.32.1-481.el9 appstream 2.2 M
perl-mro aarch64 1.23-481.el9 appstream 27 k
perl-overload noarch 1.31-481.el9 appstream 45 k
perl-overloading noarch 0.02-481.el9 appstream 12 k
perl-parent noarch 1:0.238-460.el9 appstream 15 k
perl-podlators noarch 1:4.14-460.el9 appstream 114 k
perl-subs noarch 1.03-481.el9 appstream 11 k
perl-vars noarch 1.05-481.el9 appstream 13 k
Installing weak dependencies:
perl-NDBM_File aarch64 1.15-481.el9 appstream 21 k
Transaction Summary
======================================================================================================================================
Install 65 Packages
Total download size: 64 M
Installed size: 356 M
Is this ok [y/N]: y
Downloading Packages:
(1/65): libaio-0.3.111-13.el9.aarch64.rpm 210 kB/s | 25 kB 00:00
(2/65): libtirpc-1.3.3-2.el9.aarch64.rpm 682 kB/s | 93 kB 00:00
(3/65): perl-AutoLoader-5.74-481.el9.noarch.rpm 101 kB/s | 21 kB 00:00
(4/65): perl-Carp-1.50-460.el9.noarch.rpm 360 kB/s | 30 kB 00:00
(5/65): perl-Class-Struct-0.66-481.el9.noarch.rpm 525 kB/s | 22 kB 00:00
(6/65): perl-Data-Dumper-2.174-462.el9.aarch64.rpm 917 kB/s | 55 kB 00:00
(7/65): perl-B-1.80-481.el9.aarch64.rpm 946 kB/s | 180 kB 00:00
(8/65): perl-Digest-1.19-4.el9.noarch.rpm 376 kB/s | 26 kB 00:00
(9/65): perl-Digest-MD5-2.58-4.el9.aarch64.rpm 661 kB/s | 37 kB 00:00
(10/65): perl-Errno-1.30-481.el9.aarch64.rpm 356 kB/s | 14 kB 00:00
(11/65): perl-Exporter-5.74-461.el9.noarch.rpm 713 kB/s | 32 kB 00:00
(12/65): perl-Fcntl-1.13-481.el9.aarch64.rpm 388 kB/s | 20 kB 00:00
(13/65): perl-File-Basename-2.85-481.el9.noarch.rpm 385 kB/s | 17 kB 00:00
(14/65): perl-File-Temp-0.231.100-4.el9.noarch.rpm 1.1 MB/s | 60 kB 00:00
(15/65): perl-File-Path-2.18-4.el9.noarch.rpm 396 kB/s | 36 kB 00:00
(16/65): perl-File-stat-1.09-481.el9.noarch.rpm 458 kB/s | 17 kB 00:00
(17/65): perl-FileHandle-2.03-481.el9.noarch.rpm 443 kB/s | 15 kB 00:00
(18/65): perl-Getopt-Long-2.52-4.el9.noarch.rpm 730 kB/s | 61 kB 00:00
(19/65): perl-Getopt-Std-1.12-481.el9.noarch.rpm 192 kB/s | 15 kB 00:00
(20/65): perl-HTTP-Tiny-0.076-462.el9.noarch.rpm 1.0 MB/s | 54 kB 00:00
(21/65): perl-IO-1.43-481.el9.aarch64.rpm 1.2 MB/s | 88 kB 00:00
(22/65): perl-IO-Socket-IP-0.41-5.el9.noarch.rpm 892 kB/s | 43 kB 00:00
(23/65): perl-IPC-Open3-1.21-481.el9.noarch.rpm 524 kB/s | 22 kB 00:00
(24/65): perl-IO-Socket-SSL-2.073-1.el9.noarch.rpm 1.7 MB/s | 219 kB 00:00
(25/65): perl-MIME-Base64-3.16-4.el9.aarch64.rpm 420 kB/s | 31 kB 00:00
(26/65): perl-Mozilla-CA-20200520-6.el9.noarch.rpm 295 kB/s | 13 kB 00:00
(27/65): perl-NDBM_File-1.15-481.el9.aarch64.rpm 465 kB/s | 21 kB 00:00
(28/65): perl-Encode-3.08-462.el9.aarch64.rpm 2.4 MB/s | 1.7 MB 00:00
(29/65): perl-POSIX-1.94-481.el9.aarch64.rpm 611 kB/s | 96 kB 00:00
(30/65): perl-Pod-Escapes-1.07-460.el9.noarch.rpm 520 kB/s | 21 kB 00:00
(31/65): perl-Net-SSLeay-1.92-2.el9.aarch64.rpm 1.4 MB/s | 389 kB 00:00
(32/65): perl-PathTools-3.78-461.el9.aarch64.rpm 655 kB/s | 88 kB 00:00
(33/65): perl-Pod-Perldoc-3.28.01-461.el9.noarch.rpm 959 kB/s | 87 kB 00:00
(34/65): perl-Pod-Usage-2.01-4.el9.noarch.rpm 812 kB/s | 41 kB 00:00
(35/65): perl-Scalar-List-Utils-1.56-461.el9.aarch64.rpm 1.1 MB/s | 72 kB 00:00
(36/65): perl-SelectSaver-1.02-481.el9.noarch.rpm 231 kB/s | 11 kB 00:00
(37/65): perl-Pod-Simple-3.42-4.el9.noarch.rpm 1.7 MB/s | 225 kB 00:00
(38/65): perl-Socket-2.031-4.el9.aarch64.rpm 763 kB/s | 55 kB 00:00
(39/65): perl-Storable-3.21-460.el9.aarch64.rpm 1.2 MB/s | 94 kB 00:00
(40/65): perl-Symbol-1.08-481.el9.noarch.rpm 214 kB/s | 14 kB 00:00
(41/65): perl-Term-Cap-1.17-460.el9.noarch.rpm 561 kB/s | 23 kB 00:00
(42/65): perl-Term-ANSIColor-5.01-461.el9.noarch.rpm 620 kB/s | 49 kB 00:00
(43/65): perl-Text-ParseWords-3.30-460.el9.noarch.rpm 288 kB/s | 17 kB 00:00
(44/65): perl-Text-Tabs+Wrap-2013.0523-460.el9.noarch.rpm 544 kB/s | 24 kB 00:00
(45/65): perl-Time-Local-1.300-7.el9.noarch.rpm 780 kB/s | 34 kB 00:00
(46/65): perl-URI-5.09-3.el9.noarch.rpm 1.4 MB/s | 121 kB 00:00
(47/65): perl-base-2.27-481.el9.noarch.rpm 195 kB/s | 16 kB 00:00
(48/65): perl-constant-1.33-461.el9.noarch.rpm 333 kB/s | 24 kB 00:00
(49/65): perl-if-0.60.800-481.el9.noarch.rpm 170 kB/s | 14 kB 00:00
(50/65): perl-interpreter-5.32.1-481.el9.aarch64.rpm 333 kB/s | 70 kB 00:00
(51/65): perl-libnet-3.13-4.el9.noarch.rpm 556 kB/s | 130 kB 00:00
(52/65): perl-mro-1.23-481.el9.aarch64.rpm 580 kB/s | 27 kB 00:00
(53/65): perl-overload-1.31-481.el9.noarch.rpm 827 kB/s | 45 kB 00:00
(54/65): perl-overloading-0.02-481.el9.noarch.rpm 196 kB/s | 12 kB 00:00
(55/65): perl-parent-0.238-460.el9.noarch.rpm 308 kB/s | 15 kB 00:00
(56/65): perl-podlators-4.14-460.el9.noarch.rpm 1.7 MB/s | 114 kB 00:00
(57/65): perl-subs-1.03-481.el9.noarch.rpm 181 kB/s | 11 kB 00:00
(58/65): perl-vars-1.05-481.el9.noarch.rpm 353 kB/s | 13 kB 00:00
(59/65): mysql-community-client-plugins-8.0.36-1.el9.aarch64.rpm 2.8 MB/s | 1.3 MB 00:00
(60/65): mysql-community-common-8.0.36-1.el9.aarch64.rpm 3.2 MB/s | 556 kB 00:00
(61/65): perl-libs-5.32.1-481.el9.aarch64.rpm 1.7 MB/s | 2.2 MB 00:01
(62/65): mysql-community-client-8.0.36-1.el9.aarch64.rpm 2.9 MB/s | 3.4 MB 00:01
(63/65): mysql-community-icu-data-files-8.0.36-1.el9.aarch64.rpm 2.7 MB/s | 2.3 MB 00:00
(64/65): mysql-community-libs-8.0.36-1.el9.aarch64.rpm 1.3 MB/s | 1.4 MB 00:01
(65/65): mysql-community-server-8.0.36-1.el9.aarch64.rpm 6.7 MB/s | 48 MB 00:07
--------------------------------------------------------------------------------------------------------------------------------------
Total 4.8 MB/s | 64 MB 00:13
MySQL 8.0 Community Server 2.0 MB/s | 3.1 kB 00:00
Importing GPG key 0xA8D3785C:
Userid : "MySQL Release Engineering <mysql-build@oss.oracle.com>"
Fingerprint: BCA4 3417 C3B4 85DD 128E C6D4 B7B3 B788 A8D3 785C
From : /etc/pki/rpm-gpg/RPM-GPG-KEY-mysql-2023
Is this ok [y/N]: y
Key imported successfully
MySQL 8.0 Community Server 2.2 MB/s | 3.1 kB 00:00
Importing GPG key 0x3A79BD29:
Userid : "MySQL Release Engineering <mysql-build@oss.oracle.com>"
Fingerprint: 859B E8D7 C586 F538 430B 19C2 467B 942D 3A79 BD29
From : /etc/pki/rpm-gpg/RPM-GPG-KEY-mysql-2022
Is this ok [y/N]: y
Key imported successfully
Running transaction check
Transaction check succeeded.
Running transaction test
Transaction test succeeded.
Running transaction
Preparing : 1/1
Installing : mysql-community-common-8.0.36-1.el9.aarch64 1/65
Installing : mysql-community-client-plugins-8.0.36-1.el9.aarch64 2/65
Installing : mysql-community-libs-8.0.36-1.el9.aarch64 3/65
Running scriptlet: mysql-community-libs-8.0.36-1.el9.aarch64 3/65
Installing : mysql-community-client-8.0.36-1.el9.aarch64 4/65
Installing : perl-Digest-1.19-4.el9.noarch 5/65
Installing : perl-Digest-MD5-2.58-4.el9.aarch64 6/65
Installing : perl-B-1.80-481.el9.aarch64 7/65
Installing : perl-FileHandle-2.03-481.el9.noarch 8/65
Installing : perl-Data-Dumper-2.174-462.el9.aarch64 9/65
Installing : perl-libnet-3.13-4.el9.noarch 10/65
Installing : perl-base-2.27-481.el9.noarch 11/65
Installing : perl-URI-5.09-3.el9.noarch 12/65
Installing : perl-AutoLoader-5.74-481.el9.noarch 13/65
Installing : perl-Mozilla-CA-20200520-6.el9.noarch 14/65
Installing : perl-if-0.60.800-481.el9.noarch 15/65
Installing : perl-IO-Socket-IP-0.41-5.el9.noarch 16/65
Installing : perl-Time-Local-2:1.300-7.el9.noarch 17/65
Installing : perl-File-Path-2.18-4.el9.noarch 18/65
Installing : perl-Pod-Escapes-1:1.07-460.el9.noarch 19/65
Installing : perl-Text-Tabs+Wrap-2013.0523-460.el9.noarch 20/65
Installing : perl-IO-Socket-SSL-2.073-1.el9.noarch 21/65
Installing : perl-Net-SSLeay-1.92-2.el9.aarch64 22/65
Installing : perl-Class-Struct-0.66-481.el9.noarch 23/65
Installing : perl-POSIX-1.94-481.el9.aarch64 24/65
Installing : perl-Term-ANSIColor-5.01-461.el9.noarch 25/65
Installing : perl-IPC-Open3-1.21-481.el9.noarch 26/65
Installing : perl-subs-1.03-481.el9.noarch 27/65
Installing : perl-File-Temp-1:0.231.100-4.el9.noarch 28/65
Installing : perl-Term-Cap-1.17-460.el9.noarch 29/65
Installing : perl-Pod-Simple-1:3.42-4.el9.noarch 30/65
Installing : perl-HTTP-Tiny-0.076-462.el9.noarch 31/65
Installing : perl-Socket-4:2.031-4.el9.aarch64 32/65
Installing : perl-SelectSaver-1.02-481.el9.noarch 33/65
Installing : perl-Symbol-1.08-481.el9.noarch 34/65
Installing : perl-File-stat-1.09-481.el9.noarch 35/65
Installing : perl-podlators-1:4.14-460.el9.noarch 36/65
Installing : perl-Pod-Perldoc-3.28.01-461.el9.noarch 37/65
Installing : perl-Fcntl-1.13-481.el9.aarch64 38/65
Installing : perl-Text-ParseWords-3.30-460.el9.noarch 39/65
Installing : perl-mro-1.23-481.el9.aarch64 40/65
Installing : perl-IO-1.43-481.el9.aarch64 41/65
Installing : perl-overloading-0.02-481.el9.noarch 42/65
Installing : perl-Pod-Usage-4:2.01-4.el9.noarch 43/65
Installing : perl-Errno-1.30-481.el9.aarch64 44/65
Installing : perl-File-Basename-2.85-481.el9.noarch 45/65
Installing : perl-Getopt-Std-1.12-481.el9.noarch 46/65
Installing : perl-MIME-Base64-3.16-4.el9.aarch64 47/65
Installing : perl-Scalar-List-Utils-4:1.56-461.el9.aarch64 48/65
Installing : perl-constant-1.33-461.el9.noarch 49/65
Installing : perl-Storable-1:3.21-460.el9.aarch64 50/65
Installing : perl-overload-1.31-481.el9.noarch 51/65
Installing : perl-parent-1:0.238-460.el9.noarch 52/65
Installing : perl-vars-1.05-481.el9.noarch 53/65
Installing : perl-Getopt-Long-1:2.52-4.el9.noarch 54/65
Installing : perl-Carp-1.50-460.el9.noarch 55/65
Installing : perl-Exporter-5.74-461.el9.noarch 56/65
Installing : perl-NDBM_File-1.15-481.el9.aarch64 57/65
Installing : perl-PathTools-3.78-461.el9.aarch64 58/65
Installing : perl-Encode-4:3.08-462.el9.aarch64 59/65
Installing : perl-libs-4:5.32.1-481.el9.aarch64 60/65
Installing : perl-interpreter-4:5.32.1-481.el9.aarch64 61/65
Installing : mysql-community-icu-data-files-8.0.36-1.el9.aarch64 62/65
Installing : libtirpc-1.3.3-2.el9.aarch64 63/65
Installing : libaio-0.3.111-13.el9.aarch64 64/65
Running scriptlet: mysql-community-server-8.0.36-1.el9.aarch64 65/65
Installing : mysql-community-server-8.0.36-1.el9.aarch64 65/65
Running scriptlet: mysql-community-server-8.0.36-1.el9.aarch64 65/65
Verifying : libaio-0.3.111-13.el9.aarch64 1/65
Verifying : libtirpc-1.3.3-2.el9.aarch64 2/65
Verifying : perl-AutoLoader-5.74-481.el9.noarch 3/65
Verifying : perl-B-1.80-481.el9.aarch64 4/65
Verifying : perl-Carp-1.50-460.el9.noarch 5/65
Verifying : perl-Class-Struct-0.66-481.el9.noarch 6/65
Verifying : perl-Data-Dumper-2.174-462.el9.aarch64 7/65
Verifying : perl-Digest-1.19-4.el9.noarch 8/65
Verifying : perl-Digest-MD5-2.58-4.el9.aarch64 9/65
Verifying : perl-Encode-4:3.08-462.el9.aarch64 10/65
Verifying : perl-Errno-1.30-481.el9.aarch64 11/65
Verifying : perl-Exporter-5.74-461.el9.noarch 12/65
Verifying : perl-Fcntl-1.13-481.el9.aarch64 13/65
Verifying : perl-File-Basename-2.85-481.el9.noarch 14/65
Verifying : perl-File-Path-2.18-4.el9.noarch 15/65
Verifying : perl-File-Temp-1:0.231.100-4.el9.noarch 16/65
Verifying : perl-File-stat-1.09-481.el9.noarch 17/65
Verifying : perl-FileHandle-2.03-481.el9.noarch 18/65
Verifying : perl-Getopt-Long-1:2.52-4.el9.noarch 19/65
Verifying : perl-Getopt-Std-1.12-481.el9.noarch 20/65
Verifying : perl-HTTP-Tiny-0.076-462.el9.noarch 21/65
Verifying : perl-IO-1.43-481.el9.aarch64 22/65
Verifying : perl-IO-Socket-IP-0.41-5.el9.noarch 23/65
Verifying : perl-IO-Socket-SSL-2.073-1.el9.noarch 24/65
Verifying : perl-IPC-Open3-1.21-481.el9.noarch 25/65
Verifying : perl-MIME-Base64-3.16-4.el9.aarch64 26/65
Verifying : perl-Mozilla-CA-20200520-6.el9.noarch 27/65
Verifying : perl-NDBM_File-1.15-481.el9.aarch64 28/65
Verifying : perl-Net-SSLeay-1.92-2.el9.aarch64 29/65
Verifying : perl-POSIX-1.94-481.el9.aarch64 30/65
Verifying : perl-PathTools-3.78-461.el9.aarch64 31/65
Verifying : perl-Pod-Escapes-1:1.07-460.el9.noarch 32/65
Verifying : perl-Pod-Perldoc-3.28.01-461.el9.noarch 33/65
Verifying : perl-Pod-Simple-1:3.42-4.el9.noarch 34/65
Verifying : perl-Pod-Usage-4:2.01-4.el9.noarch 35/65
Verifying : perl-Scalar-List-Utils-4:1.56-461.el9.aarch64 36/65
Verifying : perl-SelectSaver-1.02-481.el9.noarch 37/65
Verifying : perl-Socket-4:2.031-4.el9.aarch64 38/65
Verifying : perl-Storable-1:3.21-460.el9.aarch64 39/65
Verifying : perl-Symbol-1.08-481.el9.noarch 40/65
Verifying : perl-Term-ANSIColor-5.01-461.el9.noarch 41/65
Verifying : perl-Term-Cap-1.17-460.el9.noarch 42/65
Verifying : perl-Text-ParseWords-3.30-460.el9.noarch 43/65
Verifying : perl-Text-Tabs+Wrap-2013.0523-460.el9.noarch 44/65
Verifying : perl-Time-Local-2:1.300-7.el9.noarch 45/65
Verifying : perl-URI-5.09-3.el9.noarch 46/65
Verifying : perl-base-2.27-481.el9.noarch 47/65
Verifying : perl-constant-1.33-461.el9.noarch 48/65
Verifying : perl-if-0.60.800-481.el9.noarch 49/65
Verifying : perl-interpreter-4:5.32.1-481.el9.aarch64 50/65
Verifying : perl-libnet-3.13-4.el9.noarch 51/65
Verifying : perl-libs-4:5.32.1-481.el9.aarch64 52/65
Verifying : perl-mro-1.23-481.el9.aarch64 53/65
Verifying : perl-overload-1.31-481.el9.noarch 54/65
Verifying : perl-overloading-0.02-481.el9.noarch 55/65
Verifying : perl-parent-1:0.238-460.el9.noarch 56/65
Verifying : perl-podlators-1:4.14-460.el9.noarch 57/65
Verifying : perl-subs-1.03-481.el9.noarch 58/65
Verifying : perl-vars-1.05-481.el9.noarch 59/65
Verifying : mysql-community-client-8.0.36-1.el9.aarch64 60/65
Verifying : mysql-community-client-plugins-8.0.36-1.el9.aarch64 61/65
Verifying : mysql-community-common-8.0.36-1.el9.aarch64 62/65
Verifying : mysql-community-icu-data-files-8.0.36-1.el9.aarch64 63/65
Verifying : mysql-community-libs-8.0.36-1.el9.aarch64 64/65
Verifying : mysql-community-server-8.0.36-1.el9.aarch64 65/65
Installed:
libaio-0.3.111-13.el9.aarch64 libtirpc-1.3.3-2.el9.aarch64
mysql-community-client-8.0.36-1.el9.aarch64 mysql-community-client-plugins-8.0.36-1.el9.aarch64
mysql-community-common-8.0.36-1.el9.aarch64 mysql-community-icu-data-files-8.0.36-1.el9.aarch64
mysql-community-libs-8.0.36-1.el9.aarch64 mysql-community-server-8.0.36-1.el9.aarch64
perl-AutoLoader-5.74-481.el9.noarch perl-B-1.80-481.el9.aarch64
perl-Carp-1.50-460.el9.noarch perl-Class-Struct-0.66-481.el9.noarch
perl-Data-Dumper-2.174-462.el9.aarch64 perl-Digest-1.19-4.el9.noarch
perl-Digest-MD5-2.58-4.el9.aarch64 perl-Encode-4:3.08-462.el9.aarch64
perl-Errno-1.30-481.el9.aarch64 perl-Exporter-5.74-461.el9.noarch
perl-Fcntl-1.13-481.el9.aarch64 perl-File-Basename-2.85-481.el9.noarch
perl-File-Path-2.18-4.el9.noarch perl-File-Temp-1:0.231.100-4.el9.noarch
perl-File-stat-1.09-481.el9.noarch perl-FileHandle-2.03-481.el9.noarch
perl-Getopt-Long-1:2.52-4.el9.noarch perl-Getopt-Std-1.12-481.el9.noarch
perl-HTTP-Tiny-0.076-462.el9.noarch perl-IO-1.43-481.el9.aarch64
perl-IO-Socket-IP-0.41-5.el9.noarch perl-IO-Socket-SSL-2.073-1.el9.noarch
perl-IPC-Open3-1.21-481.el9.noarch perl-MIME-Base64-3.16-4.el9.aarch64
perl-Mozilla-CA-20200520-6.el9.noarch perl-NDBM_File-1.15-481.el9.aarch64
perl-Net-SSLeay-1.92-2.el9.aarch64 perl-POSIX-1.94-481.el9.aarch64
perl-PathTools-3.78-461.el9.aarch64 perl-Pod-Escapes-1:1.07-460.el9.noarch
perl-Pod-Perldoc-3.28.01-461.el9.noarch perl-Pod-Simple-1:3.42-4.el9.noarch
perl-Pod-Usage-4:2.01-4.el9.noarch perl-Scalar-List-Utils-4:1.56-461.el9.aarch64
perl-SelectSaver-1.02-481.el9.noarch perl-Socket-4:2.031-4.el9.aarch64
perl-Storable-1:3.21-460.el9.aarch64 perl-Symbol-1.08-481.el9.noarch
perl-Term-ANSIColor-5.01-461.el9.noarch perl-Term-Cap-1.17-460.el9.noarch
perl-Text-ParseWords-3.30-460.el9.noarch perl-Text-Tabs+Wrap-2013.0523-460.el9.noarch
perl-Time-Local-2:1.300-7.el9.noarch perl-URI-5.09-3.el9.noarch
perl-base-2.27-481.el9.noarch perl-constant-1.33-461.el9.noarch
perl-if-0.60.800-481.el9.noarch perl-interpreter-4:5.32.1-481.el9.aarch64
perl-libnet-3.13-4.el9.noarch perl-libs-4:5.32.1-481.el9.aarch64
perl-mro-1.23-481.el9.aarch64 perl-overload-1.31-481.el9.noarch
perl-overloading-0.02-481.el9.noarch perl-parent-1:0.238-460.el9.noarch
perl-podlators-1:4.14-460.el9.noarch perl-subs-1.03-481.el9.noarch
perl-vars-1.05-481.el9.noarch
Complete! メモ
MySQLには以下2パターンがある模様
MySQL Community Server:無償データベース
MySQL Enterprise Edition:有償データベース
3. MySQLバージョン確認
[root@homeserver ~]# mysql --version
mysql  Ver 8.0.36 for Linux on aarch64 (MySQL Community Server - GPL)
4. MySQL起動
[起動]
[root@homeserver ~]# systemctl start mysqld.service
[ステータス確認]
[root@homeserver ~]# systemctl status mysqld.service
● mysqld.service - MySQL Server
     Loaded: loaded (/usr/lib/systemd/system/mysqld.service; enabled; vendor preset: disabled)
     Active: active (running) since Sat 2024-02-17 22:16:09 UTC; 32s ago
       Docs: man:mysqld(8)
             http://dev.mysql.com/doc/refman/en/using-systemd.html
    Process: 2438 ExecStartPre=/usr/bin/mysqld_pre_systemd (code=exited, status=0/SUCCESS)
   Main PID: 2511 (mysqld)
     Status: "Server is operational"
      Tasks: 38 (limit: 49472)
        CPU: 41.705s
     CGroup: /system.slice/mysqld.service
             └─2511 /usr/sbin/mysqld

Feb 17 22:15:25 homeserver systemd[1]: Starting MySQL Server...
Feb 17 22:16:09 homeserver systemd[1]: Started MySQL Server.
5. MySQL自動起動設定
[root@homeserver ~]# systemctl enable mysqld.service
6. MySQL管理者ユーザ(root)の初期パスワード設定
[初期パスワード確認]
[root@homeserver ~]# cat /var/log/mysqld.log | grep root
2024-02-17T22:15:50.499949Z 6 [Note] [MY-010454] [Server] A temporary password is generated for root@localhost: <パスワード>
[初期パスワードおよびその他デフォルト設定の変更]
[root@homeserver ~]# mysql_secure_installation

Securing the MySQL server deployment.

The existing password for the user account root has expired. Please set a new password.

New password:

Re-enter new password:
The 'validate_password' component is installed on the server.
The subsequent steps will run with the existing configuration
of the component.
Using existing password for root.

Estimated strength of the password: 100
Change the password for root ? ((Press y|Y for Yes, any other key for No) : Y
By default, a MySQL installation has an anonymous user,
allowing anyone to log into MySQL without having to have
a user account created for them. This is intended only for
testing, and to make the installation go a bit smoother.
You should remove them before moving into a production
environment.

Remove anonymous users? (Press y|Y for Yes, any other key for No) : Y
Success.


Normally, root should only be allowed to connect from
'localhost'. This ensures that someone cannot guess at
the root password from the network.

Disallow root login remotely? (Press y|Y for Yes, any other key for No) : Y
Success.

By default, MySQL comes with a database named 'test' that
anyone can access. This is also intended only for testing,
and should be removed before moving into a production
environment.


Remove test database and access to it? (Press y|Y for Yes, any other key for No) : Y
 - Dropping test database...
Success.

 - Removing privileges on test database...
Success.

Reloading the privilege tables will ensure that all changes
made so far will take effect immediately.

Reload privilege tables now? (Press y|Y for Yes, any other key for No) : Y
Success.

All done!
メモ
上記では以下の変更を実施している
root初期パスワードの変更
匿名ユーザアカウントの削除
リモートからのrootログイン禁止
テスト用データベース(test database)の削除
設定の反映
7. MySQLへの接続確認
[root@homeserver ~]# mysql -u root -p
Enter password:
Welcome to the MySQL monitor.  Commands end with ; or \g.
Your MySQL connection id is 15
Server version: 8.0.36 MySQL Community Server - GPL

Copyright (c) 2000, 2024, Oracle and/or its affiliates.

Oracle is a registered trademark of Oracle Corporation and/or its
affiliates. Other names may be trademarks of their respective
owners.

Type 'help;' or '\h' for help. Type '\c' to clear the current input statement.

mysql>
3. PHP 1. PHPリポジトリのインストール(REMI)
[root@homeserver ~]# yum install http://rpms.remirepo.net/enterprise/remi-release-9.rpm実行例
[root@homeserver ~]# yum install http://rpms.remirepo.net/enterprise/remi-release-9.rpm
Failed to set locale, defaulting to C.UTF-8
Last metadata expiration check: 0:03:31 ago on Sun Feb 18 20:52:59 2024.
remi-release-9.rpm                                                                                     31 kB/s |  30 kB     00:00
Dependencies resolved.
======================================================================================================================================
 Package                         Architecture              Version                              Repository                       Size
======================================================================================================================================
Installing:
 remi-release                    noarch                    9.3-3.el9.remi                       @commandline                     30 k

Transaction Summary
======================================================================================================================================
Install  1 Package

Total size: 30 k
Installed size: 30 k
Is this ok [y/N]: y
Downloading Packages:
Running transaction check
Transaction check succeeded.
Running transaction test
Transaction test succeeded.
Running transaction
  Preparing        :                                                                                                              1/1
  Installing       : remi-release-9.3-3.el9.remi.noarch                                                                           1/1
  Verifying        : remi-release-9.3-3.el9.remi.noarch                                                                           1/1

Installed:
  remi-release-9.3-3.el9.remi.noarch

Complete!
ポイント
PHPに関するリポジトリファイルが追加されている
▼作業前
[root@homeserver ~]# ll /etc/yum.repos.d/
total 44
-rw-r--r--. 1 root root 4229 Mar  2  2022 centos-addons.repo
-rw-r--r--. 1 root root 2588 Mar  2  2022 centos.repo
-rw-r--r--. 1 root root 1142 Aug 17  2023 epel-cisco-openh264.repo
-rw-r--r--. 1 root root 1621 Aug 17  2023 epel-next-testing.repo
-rw-r--r--. 1 root root 1519 Aug 17  2023 epel-next.repo
-rw-r--r--. 1 root root 1552 Aug 17  2023 epel-testing.repo
-rw-r--r--. 1 root root 1453 Aug 17  2023 epel.repo
-rw-r--r--. 1 root root 2129 Oct 24 13:13 mysql-community-debuginfo.repo
-rw-r--r--. 1 root root 1989 Oct 24 13:13 mysql-community-source.repo
-rw-r--r--. 1 root root 1910 Oct 24 13:13 mysql-community.repo
▼作業後
[root@homeserver ~]# ll /etc/yum.repos.d/
total 56
-rw-r--r--. 1 root root 4229 Mar  2  2022 centos-addons.repo
-rw-r--r--. 1 root root 2588 Mar  2  2022 centos.repo
-rw-r--r--. 1 root root 1142 Aug 17  2023 epel-cisco-openh264.repo
-rw-r--r--. 1 root root 1621 Aug 17  2023 epel-next-testing.repo
-rw-r--r--. 1 root root 1519 Aug 17  2023 epel-next.repo
-rw-r--r--. 1 root root 1552 Aug 17  2023 epel-testing.repo
-rw-r--r--. 1 root root 1453 Aug 17  2023 epel.repo
-rw-r--r--. 1 root root 2129 Oct 24 13:13 mysql-community-debuginfo.repo
-rw-r--r--. 1 root root 1989 Oct 24 13:13 mysql-community-source.repo
-rw-r--r--. 1 root root 1910 Oct 24 13:13 mysql-community.repo
-rw-r--r--. 1 root root 1895 Jan  9 09:47 remi-modular.repo
-rw-r--r--. 1 root root  880 Jan  9 09:47 remi-safe.repo
-rw-r--r--. 1 root root 1518 Jan  9 09:47 remi.repo
2. PHPのインストール
[root@homeserver ~]# yum install php 実行例
[root@homeserver ~]# yum install php
Failed to set locale, defaulting to C.UTF-8
Remi's Modular repository for Enterprise Linux 9 - aarch64                                            116 kB/s | 568 kB     00:04
Safe Remi's RPM repository for Enterprise Linux 9 - aarch64                                           108 kB/s | 834 kB     00:07
Last metadata expiration check: 0:00:06 ago on Sun Feb 18 21:01:14 2024.
Dependencies resolved.
======================================================================================================================================
 Package                             Architecture               Version                            Repository                    Size
======================================================================================================================================
Installing:
 php                                 aarch64                    8.0.30-1.el9                       appstream                    4.6 k
Installing dependencies:
 libxslt                             aarch64                    1.1.34-9.el9                       appstream                    239 k
 nginx-filesystem                    noarch                     1:1.22.1-2.el9                     appstream                     12 k
 oniguruma                           aarch64                    6.9.6-1.el9.5                      baseos                       214 k
 php-common                          aarch64                    8.0.30-1.el9                       appstream                    671 k
Installing weak dependencies:
 php-cli                             aarch64                    8.0.30-1.el9                       appstream                    1.9 M
 php-fpm                             aarch64                    8.0.30-1.el9                       appstream                    1.5 M
 php-mbstring                        aarch64                    8.0.30-1.el9                       appstream                    464 k
 php-opcache                         aarch64                    8.0.30-1.el9                       appstream                    229 k
 php-pdo                             aarch64                    8.0.30-1.el9                       appstream                     78 k
 php-xml                             aarch64                    8.0.30-1.el9                       appstream                    128 k

Transaction Summary
======================================================================================================================================
Install  11 Packages

Total download size: 5.4 M
Installed size: 26 M
Is this ok [y/N]: y
Downloading Packages:
(1/11): nginx-filesystem-1.22.1-2.el9.noarch.rpm                                                       22 kB/s |  12 kB     00:00
(2/11): php-8.0.30-1.el9.aarch64.rpm                                                                  101 kB/s | 4.6 kB     00:00
(3/11): oniguruma-6.9.6-1.el9.5.aarch64.rpm                                                           307 kB/s | 214 kB     00:00
(4/11): libxslt-1.1.34-9.el9.aarch64.rpm                                                              307 kB/s | 239 kB     00:00
(5/11): php-common-8.0.30-1.el9.aarch64.rpm                                                           587 kB/s | 671 kB     00:01
(6/11): php-mbstring-8.0.30-1.el9.aarch64.rpm                                                         531 kB/s | 464 kB     00:00
(7/11): php-opcache-8.0.30-1.el9.aarch64.rpm                                                          424 kB/s | 229 kB     00:00
(8/11): php-pdo-8.0.30-1.el9.aarch64.rpm                                                              419 kB/s |  78 kB     00:00
(9/11): php-fpm-8.0.30-1.el9.aarch64.rpm                                                              553 kB/s | 1.5 MB     00:02
(10/11): php-xml-8.0.30-1.el9.aarch64.rpm                                                             370 kB/s | 128 kB     00:00
(11/11): php-cli-8.0.30-1.el9.aarch64.rpm                                                             574 kB/s | 1.9 MB     00:03
--------------------------------------------------------------------------------------------------------------------------------------
Total                                                                                                 929 kB/s | 5.4 MB     00:06
Running transaction check
Transaction check succeeded.
Running transaction test
Transaction test succeeded.
Running transaction
  Preparing        :                                                                                                              1/1
  Installing       : php-common-8.0.30-1.el9.aarch64                                                                             1/11
  Installing       : php-cli-8.0.30-1.el9.aarch64                                                                                2/11
  Installing       : php-opcache-8.0.30-1.el9.aarch64                                                                            3/11
  Installing       : php-pdo-8.0.30-1.el9.aarch64                                                                                4/11
  Running scriptlet: nginx-filesystem-1:1.22.1-2.el9.noarch                                                                      5/11
  Installing       : nginx-filesystem-1:1.22.1-2.el9.noarch                                                                      5/11
  Installing       : php-fpm-8.0.30-1.el9.aarch64                                                                                6/11
  Running scriptlet: php-fpm-8.0.30-1.el9.aarch64                                                                                6/11
  Installing       : libxslt-1.1.34-9.el9.aarch64                                                                                7/11
  Installing       : php-xml-8.0.30-1.el9.aarch64                                                                                8/11
  Installing       : oniguruma-6.9.6-1.el9.5.aarch64                                                                             9/11
  Installing       : php-mbstring-8.0.30-1.el9.aarch64                                                                          10/11
  Installing       : php-8.0.30-1.el9.aarch64                                                                                   11/11
  Running scriptlet: php-8.0.30-1.el9.aarch64                                                                                   11/11
  Verifying        : oniguruma-6.9.6-1.el9.5.aarch64                                                                             1/11
  Verifying        : libxslt-1.1.34-9.el9.aarch64                                                                                2/11
  Verifying        : nginx-filesystem-1:1.22.1-2.el9.noarch                                                                      3/11
  Verifying        : php-8.0.30-1.el9.aarch64                                                                                    4/11
  Verifying        : php-cli-8.0.30-1.el9.aarch64                                                                                5/11
  Verifying        : php-common-8.0.30-1.el9.aarch64                                                                             6/11
  Verifying        : php-fpm-8.0.30-1.el9.aarch64                                                                                7/11
  Verifying        : php-mbstring-8.0.30-1.el9.aarch64                                                                           8/11
  Verifying        : php-opcache-8.0.30-1.el9.aarch64                                                                            9/11
  Verifying        : php-pdo-8.0.30-1.el9.aarch64                                                                               10/11
  Verifying        : php-xml-8.0.30-1.el9.aarch64                                                                               11/11

Installed:
  libxslt-1.1.34-9.el9.aarch64           nginx-filesystem-1:1.22.1-2.el9.noarch           oniguruma-6.9.6-1.el9.5.aarch64
  php-8.0.30-1.el9.aarch64               php-cli-8.0.30-1.el9.aarch64                     php-common-8.0.30-1.el9.aarch64
  php-fpm-8.0.30-1.el9.aarch64           php-mbstring-8.0.30-1.el9.aarch64                php-opcache-8.0.30-1.el9.aarch64
  php-pdo-8.0.30-1.el9.aarch64           php-xml-8.0.30-1.el9.aarch64

Complete!
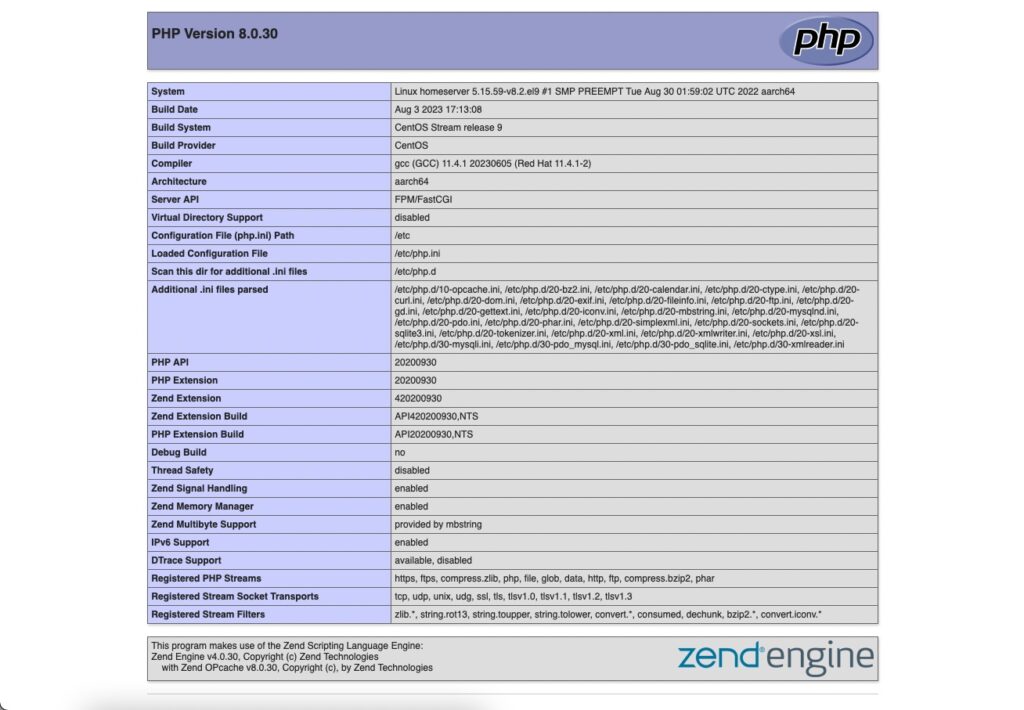
3. PHPバージョン確認
[root@homeserver ~]# php -v
PHP 8.0.30 (cli) (built: Aug  3 2023 17:13:08) ( NTS gcc aarch64 )
Copyright (c) The PHP Group
Zend Engine v4.0.30, Copyright (c) Zend Technologies
    with Zend OPcache v8.0.30, Copyright (c), by Zend Technologies
4. 関連パッケージのインストール
Webサイトやアプリケーションを動作させるために必要なパッケージのインストール
[root@homeserver ~]# yum install php-mbstring php-gd php-mysqlnd php-pdo実行例
[root@homeserver ~]# yum install php-mbstring php-gd php-mysqlnd php-pdo
Failed to set locale, defaulting to C.UTF-8
CentOS Stream 9 - BaseOS 3.6 kB/s | 4.5 kB 00:01
CentOS Stream 9 - AppStream 6.9 kB/s | 4.6 kB 00:00
CentOS Stream 9 - Extras packages 10 kB/s | 6.9 kB 00:00
Package php-mbstring-8.0.30-1.el9.aarch64 is already installed.
Package php-pdo-8.0.30-1.el9.aarch64 is already installed.
Dependencies resolved.
======================================================================================================================================
Package Architecture Version Repository Size
======================================================================================================================================
Installing:
php-gd aarch64 8.0.30-1.el9 appstream 39 k
php-mysqlnd aarch64 8.0.30-1.el9 appstream 144 k
Installing dependencies:
dejavu-sans-fonts noarch 2.37-18.el9 baseos 1.3 M
fontconfig aarch64 2.14.0-2.el9 appstream 299 k
fonts-filesystem noarch 1:2.0.5-7.el9.1 baseos 10 k
freetype aarch64 2.10.4-9.el9 baseos 383 k
gd aarch64 2.3.2-3.el9 appstream 129 k
graphite2 aarch64 1.3.14-9.el9 baseos 92 k
harfbuzz aarch64 2.7.4-10.el9 baseos 625 k
jbigkit-libs aarch64 2.1-23.el9 appstream 53 k
langpacks-core-font-en noarch 3.0-16.el9 appstream 11 k
libX11 aarch64 1.7.0-9.el9 appstream 636 k
libX11-common noarch 1.7.0-9.el9 appstream 205 k
libXau aarch64 1.0.9-8.el9 appstream 31 k
libXpm aarch64 3.5.13-10.el9 appstream 57 k
libjpeg-turbo aarch64 2.0.90-7.el9 appstream 169 k
libpng aarch64 2:1.6.37-12.el9 baseos 115 k
libtiff aarch64 4.4.0-12.el9 appstream 193 k
libwebp aarch64 1.2.0-8.el9 appstream 261 k
libxcb aarch64 1.13.1-9.el9 appstream 243 k
xml-common noarch 0.6.3-58.el9 appstream 32 k
Transaction Summary
======================================================================================================================================
Install 21 Packages
Total download size: 5.0 M
Installed size: 18 M
Is this ok [y/N]: y
Downloading Packages:
(1/21): fonts-filesystem-2.0.5-7.el9.1.noarch.rpm 47 kB/s | 10 kB 00:00
(2/21): graphite2-1.3.14-9.el9.aarch64.rpm 569 kB/s | 92 kB 00:00
(3/21): freetype-2.10.4-9.el9.aarch64.rpm 776 kB/s | 383 kB 00:00
(4/21): dejavu-sans-fonts-2.37-18.el9.noarch.rpm 2.2 MB/s | 1.3 MB 00:00
(5/21): libpng-1.6.37-12.el9.aarch64.rpm 864 kB/s | 115 kB 00:00
(6/21): gd-2.3.2-3.el9.aarch64.rpm 810 kB/s | 129 kB 00:00
(7/21): harfbuzz-2.7.4-10.el9.aarch64.rpm 1.3 MB/s | 625 kB 00:00
(8/21): fontconfig-2.14.0-2.el9.aarch64.rpm 1.0 MB/s | 299 kB 00:00
(9/21): jbigkit-libs-2.1-23.el9.aarch64.rpm 418 kB/s | 53 kB 00:00
(10/21): langpacks-core-font-en-3.0-16.el9.noarch.rpm 101 kB/s | 11 kB 00:00
(11/21): libX11-common-1.7.0-9.el9.noarch.rpm 1.4 MB/s | 205 kB 00:00
(12/21): libXau-1.0.9-8.el9.aarch64.rpm 259 kB/s | 31 kB 00:00
(13/21): libX11-1.7.0-9.el9.aarch64.rpm 2.1 MB/s | 636 kB 00:00
(14/21): libXpm-3.5.13-10.el9.aarch64.rpm 368 kB/s | 57 kB 00:00
(15/21): libjpeg-turbo-2.0.90-7.el9.aarch64.rpm 888 kB/s | 169 kB 00:00
(16/21): libtiff-4.4.0-12.el9.aarch64.rpm 1.0 MB/s | 193 kB 00:00
(17/21): libwebp-1.2.0-8.el9.aarch64.rpm 1.3 MB/s | 261 kB 00:00
(18/21): php-gd-8.0.30-1.el9.aarch64.rpm 549 kB/s | 39 kB 00:00
(19/21): libxcb-1.13.1-9.el9.aarch64.rpm 1.0 MB/s | 243 kB 00:00
(20/21): xml-common-0.6.3-58.el9.noarch.rpm 505 kB/s | 32 kB 00:00
(21/21): php-mysqlnd-8.0.30-1.el9.aarch64.rpm 1.1 MB/s | 144 kB 00:00
--------------------------------------------------------------------------------------------------------------------------------------
Total 1.7 MB/s | 5.0 MB 00:02
Running transaction check
Transaction check succeeded.
Running transaction test
Transaction test succeeded.
Running transaction
Preparing : 1/1
Installing : libwebp-1.2.0-8.el9.aarch64 1/21
Installing : libjpeg-turbo-2.0.90-7.el9.aarch64 2/21
Installing : libpng-2:1.6.37-12.el9.aarch64 3/21
Installing : fonts-filesystem-1:2.0.5-7.el9.1.noarch 4/21
Installing : dejavu-sans-fonts-2.37-18.el9.noarch 5/21
Installing : langpacks-core-font-en-3.0-16.el9.noarch 6/21
Running scriptlet: xml-common-0.6.3-58.el9.noarch 7/21
Installing : xml-common-0.6.3-58.el9.noarch 7/21
Installing : libXau-1.0.9-8.el9.aarch64 8/21
Installing : libxcb-1.13.1-9.el9.aarch64 9/21
Installing : libX11-common-1.7.0-9.el9.noarch 10/21
Installing : libX11-1.7.0-9.el9.aarch64 11/21
Installing : libXpm-3.5.13-10.el9.aarch64 12/21
Installing : jbigkit-libs-2.1-23.el9.aarch64 13/21
Installing : libtiff-4.4.0-12.el9.aarch64 14/21
Installing : graphite2-1.3.14-9.el9.aarch64 15/21
Installing : harfbuzz-2.7.4-10.el9.aarch64 16/21
Installing : freetype-2.10.4-9.el9.aarch64 17/21
Installing : fontconfig-2.14.0-2.el9.aarch64 18/21
Running scriptlet: fontconfig-2.14.0-2.el9.aarch64 18/21
Installing : gd-2.3.2-3.el9.aarch64 19/21
Installing : php-gd-8.0.30-1.el9.aarch64 20/21
Installing : php-mysqlnd-8.0.30-1.el9.aarch64 21/21
Running scriptlet: fontconfig-2.14.0-2.el9.aarch64 21/21
Running scriptlet: php-mysqlnd-8.0.30-1.el9.aarch64 21/21
Verifying : dejavu-sans-fonts-2.37-18.el9.noarch 1/21
Verifying : fonts-filesystem-1:2.0.5-7.el9.1.noarch 2/21
Verifying : freetype-2.10.4-9.el9.aarch64 3/21
Verifying : graphite2-1.3.14-9.el9.aarch64 4/21
Verifying : harfbuzz-2.7.4-10.el9.aarch64 5/21
Verifying : libpng-2:1.6.37-12.el9.aarch64 6/21
Verifying : fontconfig-2.14.0-2.el9.aarch64 7/21
Verifying : gd-2.3.2-3.el9.aarch64 8/21
Verifying : jbigkit-libs-2.1-23.el9.aarch64 9/21
Verifying : langpacks-core-font-en-3.0-16.el9.noarch 10/21
Verifying : libX11-1.7.0-9.el9.aarch64 11/21
Verifying : libX11-common-1.7.0-9.el9.noarch 12/21
Verifying : libXau-1.0.9-8.el9.aarch64 13/21
Verifying : libXpm-3.5.13-10.el9.aarch64 14/21
Verifying : libjpeg-turbo-2.0.90-7.el9.aarch64 15/21
Verifying : libtiff-4.4.0-12.el9.aarch64 16/21
Verifying : libwebp-1.2.0-8.el9.aarch64 17/21
Verifying : libxcb-1.13.1-9.el9.aarch64 18/21
Verifying : php-gd-8.0.30-1.el9.aarch64 19/21
Verifying : php-mysqlnd-8.0.30-1.el9.aarch64 20/21
Verifying : xml-common-0.6.3-58.el9.noarch 21/21
Installed:
dejavu-sans-fonts-2.37-18.el9.noarch fontconfig-2.14.0-2.el9.aarch64 fonts-filesystem-1:2.0.5-7.el9.1.noarch
freetype-2.10.4-9.el9.aarch64 gd-2.3.2-3.el9.aarch64 graphite2-1.3.14-9.el9.aarch64
harfbuzz-2.7.4-10.el9.aarch64 jbigkit-libs-2.1-23.el9.aarch64 langpacks-core-font-en-3.0-16.el9.noarch
libX11-1.7.0-9.el9.aarch64 libX11-common-1.7.0-9.el9.noarch libXau-1.0.9-8.el9.aarch64
libXpm-3.5.13-10.el9.aarch64 libjpeg-turbo-2.0.90-7.el9.aarch64 libpng-2:1.6.37-12.el9.aarch64
libtiff-4.4.0-12.el9.aarch64 libwebp-1.2.0-8.el9.aarch64 libxcb-1.13.1-9.el9.aarch64
php-gd-8.0.30-1.el9.aarch64 php-mysqlnd-8.0.30-1.el9.aarch64 xml-common-0.6.3-58.el9.noarch
Complete! メモ
各パッケージの役割
php-mbstring:日本語が扱えるようになる
php-gd:画像が扱えるようになる
php-mysqlnd:PHPとMySQLの連携が可能になる
php-pdo:PHPのPDOクラスを使用する
苦戦メモ 最初は「php-mysqlnd」ではなく「php-mysql」をインストールしようとしていた
All matches were filtered out by modular filtering for argument: **php-mysql**
Error: Unable to find a match: php-mysql
そもそも「php-mysql」というパッケージが見当たらない?
[root@homeserver ~]# dnf search php-mysql
Failed to set locale, defaulting to C.UTF-8
Last metadata expiration check: 0:51:52 ago on Sun Feb 18 21:01:14 2024.
====================================================== Name Matched: php-mysql =======================================================
php-mysqlnd.aarch64 : A module for PHP applications that use MySQL databases
php74-php-mysqlnd.aarch64 : A module for PHP applications that use MySQL databases
php80-php-mysqlnd.aarch64 : A module for PHP applications that use MySQL databases
php81-php-mysqlnd.aarch64 : A module for PHP applications that use MySQL databases
php82-php-mysqlnd.aarch64 : A module for PHP applications that use MySQL databases
php83-php-mysqlnd.aarch64 : A module for PHP applications that use MySQL databases
下記サイトの内容的に「php-mysql」と「php-mysqlnd」はメモリ使用量や機能に若干の違いはあるものの、位置付けとしては同じである可能性が高い
参考:PHPのMySQL接続ライブラリーをphp-mysqlからphp-mysqlndにした
AWS環境でのチュートリアルでも「php-mysqlnd」をインストールしていた
参考:Amazon Linux への LAMP のインストール
今回は「php-mysqlnd」を用いて作業を進めた
4. 動作確認 事前準備 1. 参考サイトより素材ダウンロード
SQLファイル名:prefecture_data.sql
データベース作成 / データの準備 1. MySQLへの接続(root)
[root@homeserver ~]# mysql -u root -p
Enter password:
Welcome to the MySQL monitor.  Commands end with ; or \\g.
Your MySQL connection id is 8
Server version: 8.0.36 MySQL Community Server - GPL

Copyright (c) 2000, 2024, Oracle and/or its affiliates.

Oracle is a registered trademark of Oracle Corporation and/or its
affiliates. Other names may be trademarks of their respective
owners.

Type 'help;' or '\\h' for help. Type '\\c' to clear the current input statement.

mysql>
2. ユーザ「lampuser」作成
mysql> CREATE USER lampuser@localhost IDENTIFIED BY '<パスワード>';
Query OK, 0 rows affected (0.09 sec)
メモ
以下のパスワードポリシーに従う必要がありそう
英大文字 を含む
英小文字 を含む数字 を含む記号 を含む8文字以上
3. 検証用データベース「lamp_test」を作成
mysql> CREATE DATABASE lamp_test CHARACTER SET UTF8;
Query OK, 1 row affected, 1 warning (0.01 sec)
4. ユーザ「lampuser」へ検証用データベース「lamp_test」に権限を与える
mysql> GRANT ALL ON lamp_test.* TO lampuser@localhost;
Query OK, 0 rows affected (0.01 sec)
5. ユーザ「lampuser」での再接続
mysql> exit
Bye

[root@homeserver ~]# mysql -u lampuser -p
Enter password:
Welcome to the MySQL monitor.  Commands end with ; or \\g.
Your MySQL connection id is 9
Server version: 8.0.36 MySQL Community Server - GPL

Copyright (c) 2000, 2024, Oracle and/or its affiliates.

Oracle is a registered trademark of Oracle Corporation and/or its
affiliates. Other names may be trademarks of their respective
owners.

Type 'help;' or '\\h' for help. Type '\\c' to clear the current input statement.

mysql>
6. データベース確認
mysql> SHOW DATABASES;
+--------------------+
| Database           |
+--------------------+
| information_schema |
| lamp_test          |
| performance_schema |
+--------------------+
3 rows in set (0.00 sec)

mysql>
テーブル作成 / データのインポート 1. LAMPサーバに動作確認用SQLファイル「prefecture_data.sql」を格納
参考:LAMP環境構築マニュアル ⑤ アプリケーション動作確認編(ファイルダウンロード可)
実行例
(base) MacBook-Pro:~ user$ scp /Users/user/Downloads/lamptest_source/prefecture_data.sql root@WebサーバIPアドレス:/root
root@WebサーバIPアドレス's password:
prefecture_data.sql                                               100% 1148   421.9KB/s   00:00
(base) MacBook-Pro:~ user$
2. データベース「lamp_test」へのデータ流し込み
[root@homeserver ~]# mysql -u lampuser -D lamp_test -p < prefecture_data.sql
Enter password:
[root@homeserver ~]#
3. データベース「lamp_test」のデータ確認
[MySQLへの接続]
[root@homeserver ~]# mysql -u lampuser -D lamp_test -p
Enter password:
Reading table information for completion of table and column names
You can turn off this feature to get a quicker startup with -A

Welcome to the MySQL monitor.  Commands end with ; or \\g.
Your MySQL connection id is 11
Server version: 8.0.36 MySQL Community Server - GPL

Copyright (c) 2000, 2024, Oracle and/or its affiliates.

Oracle is a registered trademark of Oracle Corporation and/or its
affiliates. Other names may be trademarks of their respective
owners.

Type 'help;' or '\\h' for help. Type '\\c' to clear the current input statement.

mysql>
[テーブルデータ確認]
mysql> SELECT * FROM prefectures;
+----+--------------+
| id | name         |
+----+--------------+
| 24 | 三重県       |
| 26 | 京都府       |
| 41 | 佐賀県       |
| 28 | 兵庫県       |
|  1 | 北海道       |
| 12 | 千葉県       |
| 30 | 和歌山県     |
| 11 | 埼玉県       |
| 44 | 大分県       |
| 27 | 大阪府       |
| 29 | 奈良県       |
|  4 | 宮城県       |
| 45 | 宮崎県       |
| 16 | 富山県       |
| 35 | 山口県       |
|  6 | 山形県       |
| 19 | 山梨県       |
| 21 | 岐阜県       |
| 33 | 岡山県       |
|  3 | 岩手県       |
| 32 | 島根県       |
| 34 | 広島県       |
| 36 | 徳島県       |
| 38 | 愛媛県       |
| 23 | 愛知県       |
| 15 | 新潟県       |
| 13 | 東京都       |
|  9 | 栃木県       |
| 47 | 沖縄県       |
| 25 | 滋賀県       |
| 43 | 熊本県       |
| 17 | 石川県       |
| 14 | 神奈川県     |
| 18 | 福井県       |
| 40 | 福岡県       |
|  7 | 福島県       |
|  5 | 秋田県       |
| 10 | 群馬県       |
|  8 | 茨城県       |
| 42 | 長崎県       |
| 20 | 長野県       |
|  2 | 青森県       |
| 22 | 静岡県       |
| 37 | 香川県       |
| 39 | 高知県       |
| 31 | 鳥取県       |
| 46 | 鹿児島県     |
+----+--------------+
47 rows in set (0.00 sec)
ソースファイル(.php)のアップロード / 動作確認 1. LAMPサーバのドキュメントルートに動作確認用PHPファイル「index.php」を格納
参考:LAMP環境構築マニュアル ⑤ アプリケーション動作確認編(ファイルダウンロード可)
[ドキュメントルート確認]
[root@homeserver ~]# cat /etc/httpd/conf/httpd.conf | grep DocumentRoot
# DocumentRoot: The directory out of which you will serve your
DocumentRoot "/var/www/html"
    # access content that does not live under the DocumentRoot.
[アップロード]
(base) MacBook-Pro:~ user$ scp /Users/user/Downloads/lamptest_source/index.php root@WebサーバIPアドレス:/var/www/html
root@WebサーバIPアドレス's password:
index.php                                                         100%  864   512.0KB/s   00:00
(base) MacBook-Pro:~ user$
[PHPファイルの修正]
データベースへの接続情報として「DB_PASSWORD」部分を修正
<?php
  define('DSN', 'mysql:host=localhost;dbname=lamp_test;charset=utf8');
  define('DB_USERNAME', 'lampuser');
  define('DB_PASSWORD', 'DBユーザのパスワード');

  try {
    $_db = new PDO(DSN, DB_USERNAME, DB_PASSWORD);
    $_db->setAttribute(PDO::ATTR_ERRMODE, PDO::ERRMODE_EXCEPTION);
  } catch(PDOException $e){
    echo $e->getMessage();
    exit;
  }

  $stmt = $_db->query("SELECT * FROM prefectures ORDER BY id ASC");
  $prefectures = $stmt->fetchAll(PDO::FETCH_ASSOC);

  function escape($s){
    return htmlspecialchars($s, ENT_QUOTES, 'UTF-8');
  }
?>
<!DOCTYPE html>
<html>
  <head>
    <meta charset="utf-8">
    <title>lamp-test</title>
  </head>
  <body>
    <ul>
    <?php foreach($prefectures as $prefecture): ?>
      <?php echo "<li>".escape($prefecture['name'])."</li>" ?>
    <?php endforeach ?>
    </ul>
  </body>
</html>
2. ドキュメントルートの設定変更
ドキュメントルートディレクトリをWebサーバ(Apache)が実行できるように所有者/所有グループを変更
[作業前確認]
[root@homeserver ~]# ll /var/www/
total 8
drwxr-xr-x. 2 root root 4096 Dec 14 13:17 cgi-bin
drwxr-xr-x. 2 root root 4096 Feb 20 21:28 html
[設定変更]
[root@homeserver ~]# chown -R apache:apache /var/www/html/
[作業後確認]
[root@homeserver ~]# ll /var/www/
total 8
drwxr-xr-x. 2 root   root   4096 Dec 14 13:17 cgi-bin
drwxr-xr-x. 2 apache apache 4096 Feb 20 21:28 html
所有グループに対する書き込み権限追加
[設定変更]
[root@homeserver ~]# chmod -R 775 /var/www/html/
[作業後確認]
[root@homeserver ~]# ll /var/www/
total 8
drwxr-xr-x. 2 root   root   4096 Dec 14 13:17 cgi-bin
drwxrwxr-x. 2 apache apache 4096 Feb 20 21:28 html
メモ
今回はrootユーザで操作しているため実施しないが、ドキュメントルートへソースファイルを作成できるようにするために、グループ名「Apache」にWebサーバの管理者ユーザを追加したりする模様
# gpasswd -a ユーザ名 apache
3. 動作確認
[Apacheの再起動]
[root@homeserver ~]# systemctl restart httpd.service
[ブラウザからWebサーバにアクセス]
接続先URL:http://WebサーバIPアドレス/index.php
苦戦メモ ソースファイル「index.php」にブラウザからアクセスできない
接続先URL:http://WebサーバIPアドレス/index.php
ドキュメントルートにindex.htmlを格納したら、それにはアクセスできた
接続先URL:http://WebサーバIPアドレス/index.html
PHP動作確認でよく利用される「phpinfo.php」を作成してアクセスを試してみたら接続成功
接続先URL:http://WebサーバIPアドレス/phpinfo.php
参考:WebサーバでPHPを動かす
index.phpを「test.php」という名前でコピーしてアクセスを試みたら接続成功
接続先URL:http://WebサーバIPアドレス/test.php
作業PCからSCPで再度ソースファイル「index.php」を所定のディレクトリ「/var/www/html/」にアップロードし直したら接続成功
接続先URL:http://WebサーバIPアドレス/index.php
原因の推測
SCPでLAMP環境にソースファイルをアップロードする際に、一度誤って「/root」にアップしてしまった
一度アップロード済みのindex.phpを削除し、再度「/var/www/html」に直接アップロードしたら無事にアクセスできるようになったので、もしかしたら「/root」に格納したことでファイルの権限関係が制限されていたのかもしれない
参考情報 参考:はじめてのLAMP環境構築 〜 LAMP環境とは? 参考:初めてのLAMP環境構築(Linux) 参考:CentOS 7 に LAMP 環境を構築する手順 (Apache, MySQL, PHP) 参考:centOS Strem9でApache,PHP,MySQLを設定する 参考:CentOS Stream 9にLAMP環境を構築しました!